You Are Here:Lakeland Contracting Home > Resources
|
Lakeland Contracting - ResourcesOur goal is to put together a page which contains lots of relevant information to educate readers and clients on all aspects relating to residential building and renovations. CONTENTS:Web Sites: Cottage Country Design - BCIN Certified Designer Articles: How We Do It - Seamless Eavestrough
How to Choose A Contractor10 Tips to help you in the search for the right contractor.1. Do they call back in a timely fashion? - This could be a good indication of how the communication throughout the rest of the project will go. 2. How many years have they been in business? - A company which has been in business many years 3. Have you seen any of their previous work? - Have a look at some of their previous work. This will 4. Do they have liability insurance? Do any sub trades involved have insurance? - If anything were to go wrong on the job you want to make sure that all parties involved are properly insured. 5. Do they provide a written contract for the project? - For most people it is important to know the 6. Does the contract describe all the processes needed to complete the project to your specifications? 7. Do they provide a warranty on their work? For how long? Do they honour their warranty? - If anything should go wrong with the work after it is completed, will they return to fix it? Best way to confirm this would be to ask their previous customers. 8. What condition will the property be in when the project is completed? - You don't want to be left with a mess. 9. Will they provide you with references? - One of the best ways to find out what kind of work they do,
10. One of the best ways to find a contractor is to talk to a friend or neighbour. Ask them who they used for their project. You are not likely to get a recommendation for a contractor who did a poor job! I hope these tips assist you in finding the right contractor for you! How We Do It - Installing Seamless EavestroughOur goal for this information is to educate our potential clients on the procedures we would use in completing their project. Eavestrough installation is not as straightforward as one might think. There are many factors to consider in order to complete a quality project that will last and will perform as intended with little maintenance. Let Me Break It Down 1. CHECK FOR SLOPE WITH LEVEL AND STRING AND OR LASER LEVEL PRIOR TO CUTTING DOWNPIPE OUTLETS AND SNAP CHAULK GUIDE LINE ON FASCIA
Because we are dealing with very little room to provide slope(average fascia widths are 6” – 8”) we always check slope with a string and level for short lengths and or laser level for lengths over 40’ to ensure that the trough will be able to drain in the direction we want. We do not assume the fascia is level (as quite often it’s not), and base our slope from measurements taken off the fascia. I have seen many eavestroughs installed so they looked like they sloped along the fascia but in fact were holding inches of water in the end opposite the downpipe. “The building may not always be constructed level”
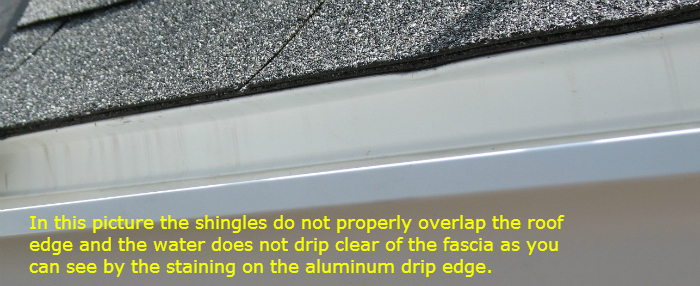
2. DETERMINE IF THERE IS THE CORRECT AMOUNT OF SHINGLE OVERLAP TO PROPERLY SHED THE WATER
There must be enough protrusion of the edge of the roofing (shingle, steel, shakes, etc.) for the water to cleanly drip from its edge down into the eavestrough below. If there is metal drip edge installed the shingles must similarly protrude past its outer edge. If this distance is not enough, the water will cling to the surfaces running onto the fascia and behind the trough. The shallower the pitch the worse this problem will be. A distance of ¾ inch for this overlap is recommended to adequately shed water off the roof away from the fascia. Since the eavestrough does not make a water tight seal against the fascia the lack of overhang by the roofing would cause major dripping behind the fascia. When we encounter this situation there are a few solutions we employ.
· First the eavestrough can sometimes be installed up under the metal drip edge if slope allows. · Second the top edge of the trough can be sealed with caulking which may require occasional repairs. · Third and the solution we use most, install a narrow strip of aluminum up under the existing drip edge and down over the back of the eavestrough. This procedure allows for a leak free install that will last as long as the trough without repairing caulking every so often. Obviously if you’re installing the eavestrough on wood fascia that has no drip edge installed with the roofing and inadequate shingle overlap then the only option is the caulking. The Alu-Rex Trex product also helps prevent leaks behind the trough as its upper edge is straight and tends to sit tighter against the fascia. Also it is much easier to seal its upper edge with caulking if required.
3. RUN EAVESTROUGH – INSTALL ENDCAPS – INSTALL DOWNPIPE OUTLETS We get the length for the eavestrough by measuring from the outer edges of the shingles on a gable roof and from the corners for changes in direction. Measuring to the edges of the shingles ensures we catch all the water running off the roof. Our eavestrough has “no seams” between end caps or corners. End Caps are installed by crimping tool and sealed on the inside with narrow seam sealant. We use pre made outlets for draining our eavestrough into each downpipe. The outlets allow for a larger smooth hole to drain water and a more secure connection to the elbow or downpipe. As well as proper sealing to ensure no leaks at the downpipe trough connection point.
4. MOUNTING SYSTEM/LEAFGUARD Our standard procedure for hanging the eavestrough is to use heavy duty aluminum hangers spaced at (12”-16”-24”), however our preferred way of installing the eavestrough is using the Alu-Rex TREX continuous hanger system. It greatly increases the strength of the eavestrough making it more able to withstand snow and ice. Screwed at 12” O.C. it is rated for 250Lbs per linear foot, that’s quite an improvement over hangers. It makes the front edge of the eavestrough stronger as well protecting against damage when ladders are leaned against the trough. It makes the eavestrough easier to seal against the fascia. It does not allow ice to build up inside the trough in the winter keeping the trough clear of ice and ready to drain water when the temperatures warm. And best of all it keeps the trough clear of leaves and other debris greatly reducing the maintenance required to keep the trough clean and working properly. All these benefits can be added to the trough at the time of installation for a great value as it takes virtually the same time to install as do the hangers.
5. MOUNT EAVESTROUGH ON FASCIA Our procedure is to mount the eavestrough onto the fascia along the sloped chalk line using either the Trex continuous hanger system or with heavy duty aluminum hangers spaced at (12”-16”-24”). We fasten both products to the wood sub fascia behind using 1 ½” Galvanized roofing screws. These screws have a steel washer backed with a rubber washer to keep the water out and a hex head drive for easy installation/removal. When the Trex product is used to hang the eavestrough it is screwed every 12” O.C. When the hangers are used it is screwed on the spacing of the hangers.
6. INSTALL MITRES AND SPLASH GUARD We typically use strip mitres to join the corners, but corners are sometimes joined using box mitre corners or the trough itself is cut, bent and sealed to make the corner (Inside or Outside). Stainless steel #6 screws are our preferred fastener used through the face of the trough for joining corners but aluminum rivets are also sometimes used. Painted screws may match the trough for a little while but will eventually rust leaving ugly stains. We then apply a generous layer of narrow seam sealant on the entire inner seam surface to make it water tight. On the eavestrough above an inside corner we mount a splash guard to help take care of extra water coming down valleys.
7. DOWNPIPE/RUNOUT INSTALLATION We use 3” x 3” large square downpipe as our standard, mounting it to the wall with pre made wall straps. We use stainless steel screws for connecting pipe, elbows and straps as they won’t stain the surfaces like steel painted screws. Our mounting procedure of wrapping the pipe with the wall strap provides a more streamlined look. The bottom of the downpipe is always best drained into and away from the building using a buried plastic drainage pipe. When in ground drainage is not available we install an elbow and short length of downpipe (usually 24”) pointing away from the building as our standard. But we can add any length you may need. Keep in mind that aluminum pipe running along the ground as a run out is easily. Damaged and may need replacing often. It is not a good idea to run the eavestrough downpipes into your buildings existing foundation drainage system.
Copyright © 2011 Lakeland Contracting/Georgian Bay Cottage Services and Construction LTD. |


